Sunday, May 15, 2016

[Activity] Skeletal Construction

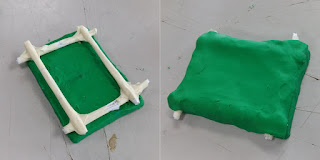
To understand more on Reinforced Concrete's skeletal construction, in this lesson, we were required to make a simple one-storey building that consists of a footing, beams, columns, slab and also reinforcement. using plasticine. We were asked to replicate the procedures of the RC skeletal construction. 

RC skeletal construction procedures: 
1. Formwork and Falsework were built
2. Placing of steel bars (reinforcement) in the formwork.
3. Concrete were then mixed and cast into the formwork. As the concrete cures, the formwork and falsework is then removed.

Since we were using plasticine, the steps 1 and 3 are simplified
Our procedures (working with plasticine):

1. The "steel bars (rolled- up paper)" were placed and tied to each other. We chose to use a mat slab as the footing,
 
(We made a mistake as the entire structure's steel bars were supposed to be tied together, from the footing, to the column, then the beams. Instead, we did it one part at a time, which resulted in an unstable structure.) 

2. After the footing, the columns were built on the steel bars. 
 

3. Next, the steel bars for the beams, and then the beams were built around it. 


4. Finally, the slab is placed on another final 2 steel bars which were placed across the beams.


The overall structure wasn't stable due to some mistakes in the procedure, but after this activity, I've learned the correct steps of RC Skeletal Construction. 


Friday, May 13, 2016

Introduction to Interior Design Project: Assignment 2a and 2b

To further understand anthropometrics and ergonomics, this assignment was to draw our daily activities (assignment 2a) and then from the activities, pick 3 and do a detailed measurement on the furnitures that we interacted in that activity (assignment 2b).

Here's the sketch to my 12 activities that I do on Saturdays:
12 activities which were sketched with pencils, then highlighted with pen of different intensities. All drawings were done by referring to photographs taken before the sketch.
 
I've picked "doing dishes", "reading" and "feeding turtles" from the 12 activities for assignment 2b, where we are required to measure the height, length and width of the furnitures and to draw them to scale of 1:20. We were also required to draw different poses that associates with the furniture. 

From the activity "feeding turtles", the furniture included was the outdoor shelf, where some gardening tools and turtle tanks are placed outside the house. 
From the activity "reading", the highlighted furniture is the couch.
From the activity "doing dishes", the furniture involved was the kitchen sink.
All of these measurements were measure in millimetres, and then drawn to the scale of 1:20. I've learned how the size of the furnitures will affect our daily interactions with them.

Introduction to Interior Design Project: Assignment 2

To understand a little of anthropometrics and ergonomics, we are asked to create a character that is related to our chosen insect. For my case, since I've chosen the German Wasp, I've created a villain with the relations to a queen German wasp.

Here are the character design sketches:
The female villain named Königin (German for queen). A few things were shown in this character design sheet: Her profile, backstory, few facial expressions, her costume and weapons, and lastly her resolution. 

After designing the character, a paper craft model is made. We were given a template to be followed. After a few tries with the making process, the first product was created.
First model
The comments I got from this were: the top of her head was too messy; her hair was not feminine-like; and her armour wasn't in scale.

After that. I've modified the head, making the hair curve a little, and also a cleaner finish to the head. The armour was also changed to match the scale. 

Second Model
In my opinion, we were given too little time for this assignment, as we could have explored more options if more time were given. At least by the end, I've learned a little about anthropometrics.

Introduction to Interior Design Project: Assignment 1b

Assignment 1b is the sequel to assignment 1a. In this assignment, the main task is to identify what design language, keywords and characteristic of our chosen subject, then creating abstract drawings and a model based on it.

4 abstract 2D drawings are made:
The main idea of this first drawing was to show how a fallen queen wasps will cause the entire nest to collapse as well. However, this wasn't considered as an abstract representation, it was more of a metaphor. 
The keywords for this drawing are: swarm, pain, and movement. The dots to create an effect of a swarm; The human form shouting to signify pain; the flapping of wings to indicate fast movements.
This drawing was to show the flight pattern of the wasps, by using the pattern on the thorax of the wasps and making it swirl to a point in a distance. 
This drawing was to indicate destruction and pain. Cracks created by the falling stingers are used to indicate the destruction and pain. 

All these sketches were then combined, as 3 keywords were identified: Attached, Passive-aggressive, and Colony. Under the guidance of lecturers, I've drew a final abstract drawing that represented the keywords:
Tiny circles that forms a swarm represents the Colony;  how the tiny circles are actually connected to the side of the main object shows Attached, as how it was once attached to the main body of the drawing; stingers and pointy edges represent the passive aggressive nature of the wasp.
Moving on with the tasks. we now have to build a 3D abstract model, which has the same design language as our 2D abstract art. I had a hard time coming up with an idea to create the model.
part of the model making progress
The mock up model was made after a few tries. 
The mock-up model 
The comment I got was that the strips in the background looked detached and unrelated, so I modified it to make a movement effect:
Front view
Close up
Top view
Side view

I had a hard time making this model, and the end product has a different look from the original idea (the model was planned to be hung in a different orientation) but in the end I made some few changes and it ended up looking like what I produced.